Unlocking Outlook: Visibility of Tasks to Others Revealed
Key takeaways :
- To assign tasks to others in Outlook, navigate to the Tasks section, click New Task, and then click Assign Task. Enter the recipient’s name or email, subject, start date, due date, and recurrence if needed. Review progress using the % Complete box.
- To delete completed tasks in Outlook 365, click on the Tasks icon, select Completed, right-click on the task, and choose to delete it. This helps in decluttering and staying organized.
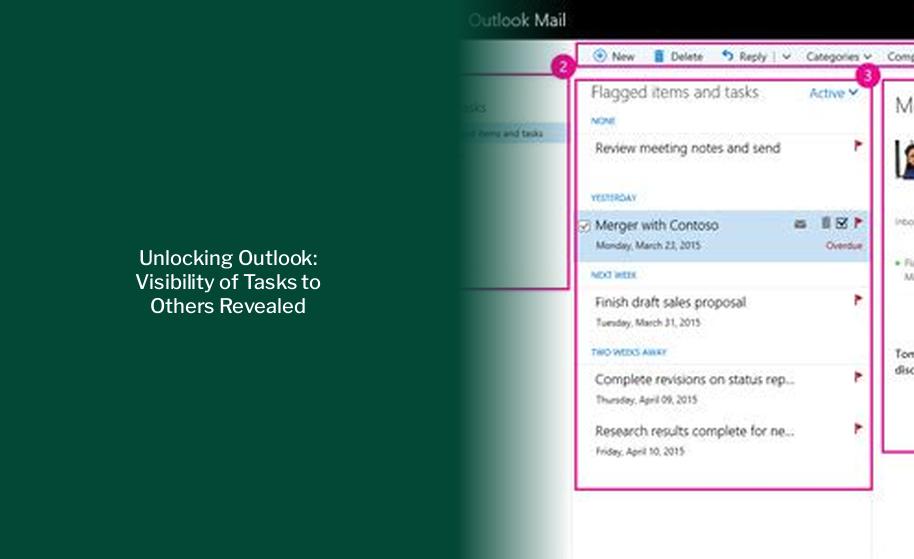
- Tasks can be displayed in three locations in Outlook: To-Do Bar, Tasks, and Daily Task List in Calendar. Tasks assigned from a SharePoint task list also appear in these locations.
- In Outlook 2010 and other versions, you can assign tasks to others by creating a task list, adding tasks, and then assigning them to the relevant individuals. This feature facilitates collaboration and task management.
How to Assign Tasks to Others in Outlook
On the navigation bar, click Tasks, and then click New Task, or open an existing task. Keyboard shortcut To create a task, press Ctrl+Shift+K. Click Assign Task. In the To box, enter a name or an email address. Enter Subject, Start date, and Due date. If you want the task to repeat, click Recurrence, select the options you want, and then click OK. Click Send.
When you open a task you assigned, you can review the progress of assigned tasks with the % Complete box which either you or the recipient can update when they send you an assigned task status report.

How to Delete Completed Tasks in Outlook 365
Instead of hiding completed tasks, you can opt to delete all that you don’t want anymore. It is a good way to declutter your outlook and stay organized. To delete completed tasks on Outlook, perform the following steps:
- Launch the Outlook app and click on the Tasks icon at the bottom left side of the window.
- Select the Tasks option and select Completed.
- Right-click on any completed task and hit OK to delete the task.
Tasks are displayed in three locations in Outlook — in the To-Do Bar, in Tasks, and in the Daily Task List in Calendar. If you subscribe to a SharePoint task list, any task assigned to you from this list also appears in all three locations.
Read Also : Decoding Email Address Sensitivity: Insights for Gmail, Yahoo Mail, and Outlook Users
Read Also : Maximizing Outlook Categories: Ensuring Visibility and Efficiency in Email Communication
Beginner: How to Assign Tasks to Other People in Outlook 2010
The Tasks feature in Outlook is a great way to keep track of what you need to get done, but it’s also a good way to help collaborate with others and assign tasks to them. Here’s how to assign tasks to other people easily. Note: the ability to assign tasks to others has been around for a while, so you can use it in previous versions out Outlook as well, it’s just in a slightly different place.
For you, Decoding the Differences: Microsoft Exchange vs. Outlook – Which One Suits You Best?
Step 1: Create a Task List and Its Tasks
The first step here is to add a new list. You simply enter the list’s name and hit the enter button: You can also create groups of task lists by hitting the create group button beside the list name field. For those who are used to simply using the general “tasks” or “planned” feature, you may not know about sharing until now. Anyway, after creating the list, enter the tasks. Note: You can’t share the tasks under the default tasks folder in Outlook. When you create new lists, you create additional task folders.
Categories: Sort the tasks alphabetically by the category you’ve assigned them. StartDate: Sort the tasks by the date the task was started. Due Date: Sort the tasks by the date on which they’re due to be completed. Folder: Sort the tasks by the name of the folder they’re in (tasks can be created in, or moved to, any folder in Outlook). Type: Sort the tasks by whether they’re a mail or a task (you can drag emails into Tasks to create a to-do item). Importance: Sort the tasks by the Importance flag – High, Normal, or Low.
Under Arrange By, you’ve got the option to Reverse Sort, which does the same as clicking the black arrow in the top right corner. You can also enable Show in Groups, which toggles between showing your tasks in groups (the default) and showing them in a simple list.