Maximizing Outlook Categories: Ensuring Visibility and Efficiency in Email Communication
Key takeaways :
- Outlook Categories are automatically removed when forwarding or replying to emails to protect personal information, but there is a way to configure Outlook to automatically assign the Categories of the original message when forwarding or replying to a message.
- To assign Categories in Outlook, go to the Home tab, choose Categorize from the Tags group, select a category, choose a shortcut key, and click OK to save the changes.
- You can rename an existing Outlook Category by navigating to the Tags section, clicking Categorize, selecting All Categories, highlighting the Category you want to rename, clicking Rename, typing the new name, and clicking OK to save the changes.
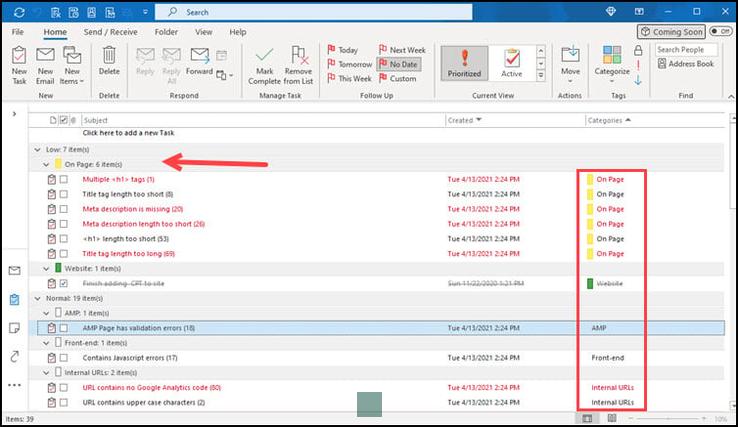
- After customizing your Outlook category list, you can start adding color Categories to messages, and you can add more than one Category to a single message, and all categories you apply attach to future contributions to the email chain.
- This article explains how to use categories to organize messages in Outlook for Microsoft 365, Outlook 2019, Outlook 2016, Outlook 2013, and Outlook 2010.
- To create a Category on Windows, open the “Categorize” menu and follow the provided steps.
How to Maintain Outlook Categories When Forwarding or Replying to Emails

I sort my email by using Categories and I do the same for my outgoing emails. However, when I forward or reply to a message that I have categorized, my Categories are being removed for this forward or reply message, and I need to reassign them. Is there a way to configure Outlook to automatically assign the Categories of the original message when forwarding or replying to a message? This would then automatically sort my outgoing emails. By default, Outlook strips these Categories so they won’t be visible to the receiver as Categories could contain personal information (as you are free to name them whatever you want).
— Unlock the Benefits: Outlook Accounts Explained
Assigning Categories in Outlook
To assign Categories in Outlook, follow these steps:
More — Decoding the Differences: Microsoft Exchange vs. Outlook – Which One Suits You Best?
More — Safeguard Your Email: Are Outlook Ads Safe? Unveiling the Truth and Solutions
- Click the Home tab.
- Choose Categorize from the Tags group and choose All Categories.
- Select a category.
- Choose a shortcut from the Shortcut Key drop-down.
- Click OK to save the changes.
Renaming an Existing Outlook Category
- On your Outlook Home tab, navigate to the Tags section and click Categorize.
- In the pop-up box, scroll down to the bottom of the list and click All Categories.
- In the Color Categories box, click on the Category you want to rename to highlight it.
- Click the box for Rename.
- Type your new name and click OK to save the changes.
After customizing your Outlook category list, you can start adding color Categories to messages. You can add more than one Category to a single message, and all categories you apply attach to future contributions to the email chain — replies and forwards, for example.
Creating Categories on Different Platforms
This article explains how to use categories to organize messages in Outlook for Microsoft 365, Outlook 2019, Outlook 2016, Outlook 2013, and Outlook 2010.
Create a Category on Windows
- Open the “Categorize” menu and select “All Categories.”
- Click “New” and add the label, color, and shortcut key.
- Click “OK” to save the new category.
Create a Category on Mac
- Open the “Categorize” menu and select “Edit Categories.”
- Click the “plus sign” to add a new category.
- Enter a category name, choose a color, and click “Add” to save the category.
— Outlook vs Hotmail: Unveiling the Differences in 2023
Create a Category on the Web
- Open the “Categorize” menu and select “New Category.”
- Enter a label, choose a color, and click “Save.”
Frequently Asked Questions
Why are my Outlook categories not showing? There are a couple of possible reasons why you may not see categories in Outlook. First, the category feature is not available for IMAP email accounts.