Unlocking the Visibility of Outlook Color Categories for Delegates: A Comprehensive Guide
Key takeaways :
- Delegate access to Outlook Calendar folders may not display color-coded categories by default.
- Outlook color categories are stored within the main Calendar folder of the mailbox owner.
- To view color coding as a delegate, required permissions on the main Calendar folder need to be granted.
- Renaming an existing Outlook category can be done through the Tags section on the Home tab in Outlook.
- After customizing the Outlook category list, it’s possible to add color categories to messages in various ways.
How to View Outlook Color Categories as a Delegate
I’ve been granted delegate access to the Calendar folder of my manager. He uses various color coded categories for his appointments. While I can see all his appointments when I access his Calendar folder, I can’t see any of the color coding anymore. How can I see the color coding of his Calendar as a delegate?
Required Permissions on the Main Calendar

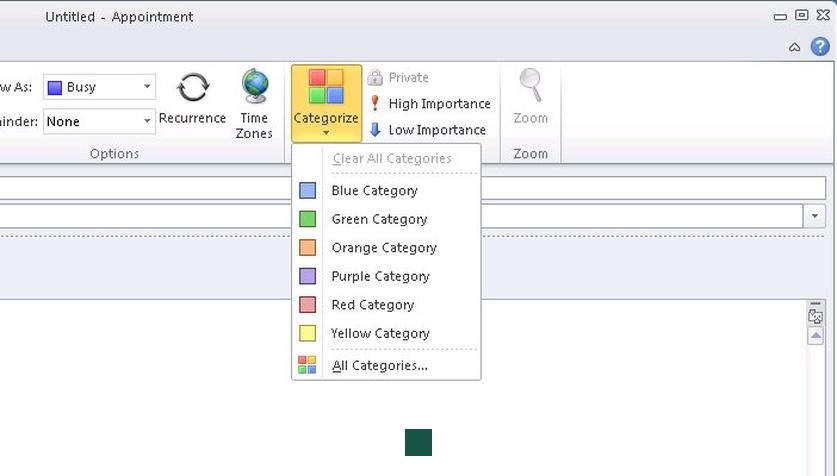
Since Outlook 2007, The Color Categories are stored within the main Calendar folder of the mailbox owner. When you click a calendar event in Outlook, the Categorize option will be visible in the Appointment/Meeting section of the ribbon. Click Categorize to select one of the categories you’ve created. If you want to add or edit an existing category, click All Categories. To apply a category, select a calendar event. Then, either click Categorize and select a category or use its keyboard shortcut to apply it.
How to Rename an Existing Outlook Category

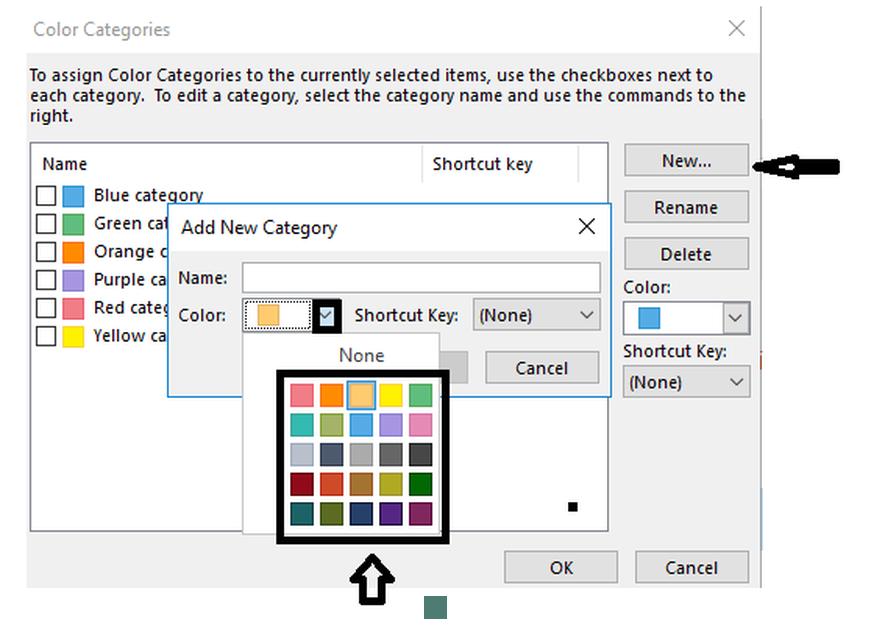
- On your Outlook Home tab, navigate to the Tags section (it’s the fifth section from the right) and click Categorize.
- In the pop-up box, scroll down to the bottom of the list and click All Categories.
- In the Color Categories box, click on the Category you want to rename to highlight it.
- Click the box for Rename.
- Start typing your new name, and it will appear next to the Category you want to edit.
- Click OK to save the name of your new Category.
After you’ve created and customized your Outlook category list the way you want it, you can begin adding color Categories to messages, in a few different ways. You can add more than one Category to a single message, and all categories you apply attach to future contributions to the email chain — replies and forwards, for example.
Read Also : Unlock the Benefits: Outlook Accounts Explained
I have a shared mb that was set up by IT, accessing via O:365. I’m listed as the owner and have used the Manage Categories function to delete all the default color categories and add 4 custom color and named categories for events in the shared calendar. When I select the Categories flyout menu, it’s just the 4 custom. When other users who have been shared permission go to edit an event’s Category, they see my custom categories, plus all the original defaults that I had previously deleted. Any reason why this is happening or how to fix?
Categories for Organization
- To assign a category to an email, right-click the message, choose Categorize, then pick a category.
- The first time you use a category, Outlook asks if you want to rename it. Otherwise, it’s named for a color. You can create a category by selecting New > Name > Color > OK.
- To see all categories, select Categorize > All Categories.
You can follow the same process for calendar events and contacts. When creating meetings, select Categorize, then select your category.
For the application version, the easiest way is as follows:
- Single-click an appointment on your Outlook calendar.
- On the ribbon, the Appointment tab should open.
- Click Categorize.
- From the drop-down menu, select All Categories to open the Color Categories window.
- Select New to create a new category.
- Name your category and select a color of your choosing.
- Repeat for as many categories as you like, and click OK on both windows to apply it.
We set up Outlook calendars in my company in a shared way. This works correctly, we found the solution by going to modify each of the categories_list.xml files on each of the workstations. However, one last problem is against us, when a user (A) adds an appointment to his calendar, for example, and the latter invites another user (B) to this appointment, the appointment does appear for user A and B but for user B the category color does not apply. Do you have a suggestion to fix this problem? Thank you in advance 😉
- Click People > Home > Categorize > All Categories.
- Click New, type the name you want to use, and then click the arrow next to the Color box to pick your color. Tip: To make it easy to add contacts to this category, pick a shortcut under Shortcut Key. Then the next time you want to assign contacts to this category, select them in your contact list and press the shortcut key.
When you’re done assigning color categories to people, you can quickly sort your contacts by color to see the ones you want.
More related > Maximizing Outlook Categories: Ensuring Visibility and Efficiency in Email Communication